Wednesday 13 March 2013

TBP: The Awful Truth

Hello everyone. There is something I have to tell you. Something awful. The biggest trend in baking at the moment are cupcakes. Beautiful, dainty, colourful cupcakes. Just turn on the Food Network at any time and there will be some cupcake programme showing a couple amateurs churning out a hundred perfect cupcakes. Everyone loves cupcakes. Everyone can make cupcakes: a three-year old child, Nana, the family dog.

Everyone, but me.

The first things I remember baking with my mum when I was a kid were fairy cakes. I have to admit, it's not all bad news. I can make some decent vanilla or chocolate cakes with a lovely glace icing. But who wants glace icing when you can have some incredible buttercream creation?! No one. That's who.

Firstly the cakes themselves. I went for a classic cupcake recipe. Butter, sugar, eggs, flour, vanilla essence and baking powder. Simple. The only hiccup I had was that room temperature that day was cold. Too cold to soften the butter. I had to stick it by the fire to soften it faster and Baxter kept trying to crawl up unnoticed and eat it all:

Leave it with me, I promise I won't eat it...
I don't ever use a buttercream recipe (probably a mistake), and just wing it. After about five attempts it still hasn't worked but no, I have not learnt my lesson. This time the icing actually stayed stiff enough to pipe and went into the bag well. In an attempt to make a pale pink icing I added a drop of red food colouring, unfortunately added to bright yellow butter it ended up an extremely questionable colour. I believe the comment made was: 'Why are they brown?'.

So here are my cakes:


Look how nice they look: golden, light and risen...

Now, ten minutes later:


EUGH. What is that icing meant to look like?! A dog turd?

Maybe second time will work better...


No. No, it won't.

I tried another technique. 'Maybe just some blobs or something would look nice.' I thought:

The next cupcake decorating phenomenon: anemones
Not awful...but by this point I'd run out of my icing. Good one.

The rest of them got a blob on top which was spread about with a pallet knife. My go to technique once I've tried and failed with a nice swirl. For some reason I then stuck some silver blobs on top. Well they did taste nice, better than my icing, which incidentally I had made with too much butter and not enough sugar.

Tastier than they look
On the plus side the cake was nice...I can only hope mum enjoyed her Mother's Day gift, made with love and thought!

For the purpose of The Baking Project, I would like very much to actually learn to decorate a cupcake nicely. At the moment I use a 1cm star nozzle for piping swirls, and I am coming to the conclusion that I need a much larger one for the nice cupcake swirls you see. Sadly, that is the largest I own. What can you recommend?

S.x


Wednesday 6 March 2013

TBP: Plaited Loaf

The last two weeks I have been busy getting stuff sorted for three months travelling/volunteering in Costa Rica, meaning I'm afraid I missed last week's baking project entry. Fear not, as I have been making a mess in the kitchen, but I must admit there has been a little cheating. Last week I baked twice. Firstly, some of my favourite vanilla chocolate chip cookies for J. as an Anniversary gift. Unfortunately I forgot to take photos, but honestly, they didn't come out as attractively as usual so I will wait until then next batch to photograph them!

Next I baked some simple scones, a spur of the moment bake. These only take 30 minutes, preparation and cooking, so are perfect for a quick teatime treat! The recipe I used made 7, which was the right amount for my mum and I. I could have cut them a little thicker I think, but with both baking powder and self raising flour, the end result wasn't too thin. 


This week I made Paul Hollywood's eight plaited loaf found in the Bake Off book. Bread's have always been a favourite of mine. For about a year now, I have made pizza at least twice a month and I have developed a technique with doughs. 


After mixing and kneading I had a silky, elastic dough. After an hour it had completely blown up, filling the bowl! I don't have a proofing drawer or box, but it rose just sitting in a bowl in the kitchen. 

Next I knocked it back and made the complicated eight stranded plait. I can barely plait my own hair into pigtails, and every time I try a french plait or fishtail my hair ends up looking like a confused, straggly octopus. I was under no allusions that this would be a work of art. 

Well this was the first attempt:


Not awful... just a little confused! 

My second attempt worked out a little better: 


After an egg glaze and 20 minutes in the oven, I was left with this monster of a loaf! The bread was also lovely, with a good crumb (I think...what does that even mean Paul and Mary?) The bread worked as a great sauce soaker with a chicken, chorizo and chickpea casserole, and what little remained was toasted by Mum and used for a sandwich by J. the next day. A good result all round with no waste!

S. x

Sunday 24 February 2013

Spring Arrives (For a Day)

Last time I went for a walk with my camera I had the chance to document the British countryside in all its snowy glory. Those photos more closely resembled Narnia than the surroundings I'm used to seeing. Since then we've had a constant onslaught from rain and wind, so when we finally had a few days of sun I leapt on the chance for a long walk armed with my camera. I thought I'd share some of the photos from my walk, and a glimpse of a sunny Welsh winter's day. 


Just look at that lovely blue sky! It feels like Spring is on its way, and if the weather stays as lovely as this, I'll definitely be walking more and sharing more photos with you. I'm also looking forward to the above scenes in full bloom, especially the weeping willows. The only obstacle is that today...it's snowing again. Typical temperamental British weather. 

S. x


Wednesday 20 February 2013

TBP: White Chocolate Tart and Some Actual Cooking

Last week I mentioned baking something for J's Valentine's Day gift. As I mentioned before, I'm not a massive fan of overly sweet desserts, but J asked for a white chocolate pie so I decided to give it a go. It took me a while to try and find the best recipe. I skipped the cream cheese ones (although in hindsight perhaps that was a bad idea) and chose this white chocolate and raspberry tart. This recipe would lead to my first attempt at blind baking. With J. scheduled to arrive at 5pm, I started just before lunch: my optimism - and pride - not yet dented. 


I started with the pastry case. Although the recipe uses a food processor, I mixed the ingredients by hand. It worked well as the ingredients only needed to be rubbed together to form a dough, so don't worry if you don't have a food processor yourself. Once made and chilled, I lined the tin and rolled a pin over the tin so the excess pastry fell off. This technique leaves a perfect fit...or so I thought.


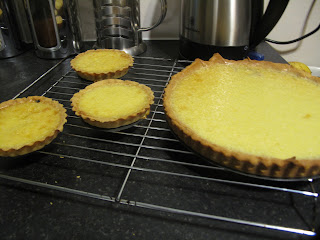
Within about two minutes of blind baking I saw the edges had shrank. I baked it to the full time anyway and ended up with that mess. Luckily I had enough extra pastry to make three small tarts. This time I left the excess pastry on (as stated in the recipe) and had a better result.


I then filled the pastry cases with a white chocolate and egg filling and popped the tarts back in the oven for their final bake.


By the time I had done this J. had already arrived, and it was already time to make dinner. So much for my fantasy of having the one pie displayed proudly on the cake stand when he arrived.


Although not a bake, I'd thought I'd include shots of the meal anyway. I made a seafood pasta (although the recipe is spaghetti, I prefer linguine myself). I would definitely recommend this to anyone who wants a quick, simple meal. It is all cooked within one pot or wok - the pasta is even cooked in the sauce - and anything could be added to it. If you don't like seafood, you could add chicken, veggies, chorizo etc. It takes 20 minutes to half an hour to prepare and cook, and I served it with my favourite side - a handful of spinach leaves with some lemon squeezed over the top. With only one pot, it was quick to wash up as well - unlike the large amount of dishes associated with the tarts!


So after 40 minutes in the over I ended up with this motley crew of tarts. The pastry was uneven (no surprises there) and the filling looked curdled! Although the pastry didn't taste burnt, the outside looked a little dark as well. 


We ate the small ones first as they looked more appetising. The pastry worked well - thin, crisp and no soggy bottom! The pie was actually quite nice, served with some raspberries, it was light and not too sweet. However. There was practically no hint of the white chocolate (although I used 300g - three big bars) and they tasted like egg custard tarts. Tasty, yet it turns out J. dislikes egg custard tarts. So much for that thoughtful gift. Later, we tasted the large pie, which tasted very white chocolatey. I think if I make a similar filling again I would make sure I actually mixed it properly...

Hope you all enjoyed Valentine's Day - whoever you spent it with, and for those who aren't interested, you had a great Thursday! 

Until next week,

S. x


Wednesday 13 February 2013

TBP: Life of Chicken Pi(e)

It's Wednesday, and therefore time for a Baking Project update! So last week I felt like making something savoury. The food we usually cook is fairly low fat, ethnic cuisine, so when I chose to bake something for dinner it was definitely a contrast to our regular dinners. I wanted to try pastry so I decided to make a chicken, leek and tarragon pie.


The first thing to do was to make the pastry. A fairly standard shortcrust pastry split into two parts, one for the base the other for the lid. I'd made pastry a few times before and I often make bread dough so this wasn't too hard. I did have a bit of trouble rubbing in the butter though. I haven't yet worked out whether it is more effective to use butter straight from the fridge or at room temperature when making 'breadcrumbs'. 

After probably too much kneading, I left the pastry to chill and made the filling. Not hard at all, just throw the chicken, leek, ham and herbs in together and add milk, butter and flour for a filling reminiscent of white sauce. 

The pie was also not too difficult to assemble. I made sure to roll the pastry out so it was thin - a few millimetres thick - and it luckily did not fall apart as I lined the dish. I've heard that even if the pastry breaks, you can leave leftover pastry to fill the gaps anyway which is rather handy. I laid a thin layer of pastry over the top for the lid, glazed with an egg and popped it in the oven. I only needed half of the pastry I had made for the pie, so I froze the rest for another time.


Before the bake
The pie was baked and voila! Out emerged a golden, crisp looking pie! I was optimistic. Now for the taste test.


To be honest, the filling was not for me. I was very happy with the pastry, I could just eat tasty pastry on its own and this was no exception. The top was crispy and there was no soggy bottom - something I was very surprised at! Although the chicken was tasty and the tarragon gave an unusual almost aniseed-like flavour. However my mum and I thought the ham was unnecessary, and if I made this recipe again I would substitute it for some vegetables, mushrooms, sweetcorn and perhaps something like cauliflower. 

The leftovers...

My mum had the leftovers the next day, just popped back into the oven to heat up, and I was told it was still good - maybe even better! 

I don't know whether I would recommend this recipe, but I would be interested in making another pie. What is your favourite pie recipe?

As it's Valentine's Day tomorrow, there's love in the air. I am not making any heart shaped biscuits I'm afraid. Next week's bake is however, a gift for J. I would not have chosen it myself, but it'll be interesting to see how it turns out! 

S. x


Wednesday 6 February 2013

TBP: Caramel Layer Cake

I have decided that from now on I will be updating The Baking Project every Wednesday! Therefore I will be baking something at least once a week in order to keep up with the updates.

This week's bake was my first cake in quite a while, a caramel layer cake. It is made up of three layers of vanilla sponge with a sea-salt caramel filling and icing and a chocolate-caramel filling.

I was tasked to make a pudding for a 11 - 12 people coming for dinner last Sunday. The occasion was a send off for my brother and his girlfriend as they embark on a six month road trip to North America. For the foodies out there, he will be blogging about his culinary experiences here.

I'd been eyeing up this cake for a while, but just hadn't found a time to make such a large dessert, so I was quite excited to get stuck in!

Ingredient wise, nothing unusual or hard to source so had no problems getting what I needed from the local supermarket. The sponge was fairly basic, although I did have trouble beating out all the lumps, even though I was using an electric whisk. In the end I left a few as I felt I was close to over beating the mixture - if I hadn't already. The mixture was spread over three sandwhich tins and went into the oven.


I forgot to take any pictures between this and the result, so I apologise for that! The sponges didn't rise very well, but they were a lovely golden colour. I also discovered a bit more about my oven, the sponge on the bottom needed an extra minute, while the sponge on the top left was a little darker than that on the right. Not a problem, and useful to know how the position around the oven could affect the bake.

While leaving the sponges to cool, I made the caramel filling. I don't have a very sweet tooth, so I added a little extra salt than the recipe stated which I think worked well. The cake with the large amount of filling and icing would have tasted way too sweet without the salty caramel. However,  I couldn't make the chocolate-caramel filling work. Once I combined the caramel and melted chocolate, the mixture became very grainy and frankly pretty unappetising, so I decided to discard it.

The cake wasn't hard to assemble (even though the recipe warned of landslides) and the caramel was exactly the right consistency for an easy spread and cover. I piped an admittedly shakey spiral, and used a cocktail stick to feather. From the picture attached, you can probably gather that I a) can not make a straight line and b) can not judge an even slice (you should see my pizza slicing).

As I was busy the day before, I made this recipe on the Friday before. The recipe stated that the cake's flavour matures, so to make it a day before. Although I couldn't taste it on the day, at least the cake apparently got better with age rather than...stale.

The final cake
 Sunday came, and the cake was to presented to the guests. I am not, by anyone's imagination, the world's best slicer, but I was pleasantly surprised by the slices! There are little crumbs, and the filling and icing had set completely creating a clean, attractive slice. So appearance, check, how about taste? Everyone cleaned their plates (that I could see) and it went down a treat!


It was a shame I couldn't use the chocolate-caramel filling, but I don't think the cake suffered because of it. I ended up with a tasty cake and would recommend the recipe if you want something with a slightly unusual flavour.

I have no clue what next week's bake will be yet, but I'm craving something savoury. Have you made a cake which incorporated a strong salty flavour?

S. x

Friday 1 February 2013

The Baking Project

In an earlier post I spoke about my project to learn how to bake. In this entry I'll get us up to date to where I am in what we will now officially call... 'The Baking Project'.

Bet you didn't see that coming.

So what have I baked so far? I have mostly been using recipes from the The Great British Bake Off book 'How To Turn Everyday Bakes into Showstoppers', and as I mentioned before, my success rate is average at best.

The project to date:

- Creme caramel - success! Couldn't really believe they worked on the first attempt. The caramel could have been darker, but I have never cooked it before and was scared it would burn.

- Meringue swirls - awful. My second baking attempt was not the best. My egg white was stiff, until I started mixing in food colouring which changed the consistency. My piped swirls were not anywhere near large enough, and unfortunately this completely messed up the baking time. The recipe stated 1 - 2 hours. One hour later, I had a dozen or so burnt little meringue blobs. I have made chocolate swirl meringues in the past which worked out great, so I will be trying meringues again later on in The Baking Project.

- Gingerbread snowflakes. These were so much fun to make, I'd encourage anyone to do it. I love piping, so decorating was a highlight.
As these worked so well, and looked pretty I also made a batch for Christmas decorations. I poked a hole in each to string ribbon through to hang up. Although they looked good, the first bake at 10 - 11 minutes were a little burnt on the edges, while the second at 8 minutes were definitely too doughy and undercooked. As a result, most ended up rather sad looking...

His smile is deceiving. 
The recipe is fairly easy - I just need to perfect my baking time - and I would recommend it to fellow beginner bakers.

- Brandy snaps - Failure. Brandy snaps take two - less so, but still a failure.

I'll start by saying that both batches tasted good. Gingery and as J. noticed, reminiscent of Werther's Original toffees. The first problem was, however hard I tried, I could not get them off the tray for the life of me! They were stuck hard, and after much caressing, poking and finally ripping, I had to say goodbye to the brandy snap dream. I took to the internet after this first batch and read that a silicon baking sheet would solve any potential sticky dilemmas. I stomped (drove) off to Homebase, and bought myself a new baking sheet and flat tray for batch two.

I repeated the recipe, and watched them spread in the oven. With trepidation I removed the b'snaps after the stated baking time and waited for them to cool a little. My shaky hands started to lift the edges from the silicon...and voila! They came off and rolled happily around my wooden spoons. I left them to set with optimism blossoming in my heart....but in some hideous twist of fate, they then stuck to the spoons instead. Carefully I pried the brandy snaps off the spoons, and although lovely and snappy on the edges, they were more brandy mush in the centre. I imagine the reason for this is that they were a little undercooked in the centre and therefore became this:

Just like Mary Berry's
- Viennese Fingers - A little ugly but tasted yummy! Relatively easy to make, but I had an absolute nightmare finding the right piping equipment. I didn't have a wide enough nozzle, so I had to go with out. As the mixture is quite thick, the disposable bag burst while I was piping and I ended up with this monstrosity growing out the side:

Like something out of a baking Alien movie
In hindsight, I should have piped in more of a 'zigzag' so they looked less like...well, I'll leave it to you to finish that sentence. Regardless of what they look like, they tasted great and we're eaten up in no time at all.


So, have you had any baking disasters? Or have you found yourself a natural baker?

Stay tuned for the next failure entry in The Baking Project!

S. x